Getting started with EC2

This tutorial will get you started with Cloud9 on Amazon's EC2 (running the simple word count demo). For a gentler introduction to Hadoop, or if you don't feel like experimenting with EC2, try my tutorial on getting started in standalone mode. This tutorial assumes you've already downloaded the libraries and gotten it set up.

Before we begin, a few notes:

  • For writing these instructions I used Hadoop 0.20.1 (stock distribution available from Apache) and Sun's Java JDK 1.6.0_06 on Windows XP (with Cygwin). However, these instructions should be applicable to other operating systems. In fact, the Hadoop EC2 scripts are not very Windows-friendly at all (I'll describe several workarounds below).
  • For Windows users: If you are using Windows, you must use Cygwin, as the EC2 tools will not work with the Windows command prompt. You will also need ssh, which is not installed as part of Cygwin by default. Once you've installed Cygwin, run the setup program and specifically install it.
  • Note that I'm showing commands as they apply to me: you'll have to change paths, name of machines, etc. as appropriate.
  • In capturing traces of commands running, I use the convention of [...] to indicate places where the output has been truncated.
  • You'll be typing a lot of commands on the command-line. What I've found helpful is to keep a text file open to keep track of the commands I've entered. This is useful for both fixing inevitable typos in command-line arguments and for retracing your steps later.
  • It is best to allocate an uninterrupted block of time to this tutorial, because once you start up an EC2 cluster, you're being charged by time.
  • There's a section at the end of this tutorial on common issues.

Just to give you an overview, here are the steps:

Let's get started!

Step 1: Setting up Amazon EC2

Go to the Amazon AWS site to set up an AWS account. Follow the steps at Amazon's EC2 Getting Started Guide, up through the "Generating a Keypair" section of the "Running an Instance" page (page 5). The current version of the EC2 API tools is 1.3-46266.

Helpful tip: when you generate an access key, try to avoid one that has a slash (/) in it—this will save you some effort later, because some tools cannot properly parse the slash and treats it as a path. If you get an access key that has a slash, just regenerate.

Step 2: Fire up a Hadoop cluster in the clouds!

You'll want to consult Running Hadoop on Amazon EC2 for reference, but I'll summarize the instructions below. To begin, make sure you're working with Hadoop 0.20.1 (stock Apache distribution) and have the EC2 environment variables properly set (see previous step). Note that all the Amazon tools begin with "ec2-", which distinguishes them from tools bundle in the Hadoop distribution.

In case you are curious, here's how you find all available Hadoop images with the Amazon EC2 tool.

$ ec2-describe-images -x all | grep hadoop

You'll be surprised at how many Hadoop AMIs there are!

Open the file hadoop-0.20.1/src/contrib/ec2/bin/hadoop-ec2-env.sh. Fill in the following variables with information from you own account:

  • AWS_ACCOUNT_ID (no dashes)
  • AWS_ACCESS_KEY_ID
  • AWS_SECRET_ACCESS_KEY

If you're using Cygwin, you may also want to tweak the following variables:

  • MASTER_PRIVATE_IP_PATH
  • MASTER_IP_PATH
  • MASTER_ZONE_PATH

These files store information about the cluster you've started up. The variables have paths containing ~, which in Windows will map to something like "C:\Documents and Settings\...". That's a path containing spaces, which breaks some of the Hadoop EC2 scripts.

For Cygwin users only: As previously mentioned, the Hadoop EC2 scripts are not very Windows-friendly. If you don't implement the below workaround, you'll get the following error.

Invalid argument for option '-f, --user-data-file DATA-FILE': '/cygdrive/c/...' (-h for usage)

The issue is that USER_DATA_FILE, defined in hadoop-ec2-env.sh, needs to be passed in as a parameter to the EC2 startup scripts. Something strange about Cygwin screws that up. To fix the problem, you'll need to go into hadoop-0.20.1/src/contrib/ec2/bin. On line 88 of launch-hadoop-master, you'll see this following line:

INSTANCE=`ec2-run-instances ... -f "$bin"/$USER_DATA_FILE ...

Remove the "$bin" so that it reads:

INSTANCE=`ec2-run-instances ... -f $USER_DATA_FILE ...

On line 53, of launch-hadoop-slaves, you'll see this following line:

ec2-run-instances ... -f "$bin"/$USER_DATA_FILE.slave ...

Remove the "$bin" so that it reads:

ec2-run-instances ... -f $USER_DATA_FILE.slave ...

<end Cygwin workaround>

Open a shell and go to hadoop-0.20.1/src/contrib/ec2/bin. Launch a EC2 cluster and start Hadoop with the following command. You must supply a cluster name (test-cluster) and the number of slaves (2 in my case). At this point, it makes no sense to start up a large cluster (even if you can!)—one or two nodes is sufficient. After the cluster boots, the public DNS name will be printed to the console.

$ ./hadoop-ec2 launch-cluster test-cluster 2
Testing for existing master in group: test-cluster
Starting master with AMI ami-fa6a8e93
Waiting for instance i-961a15fe to start
..................Started as domU-12-31-39-02-61-03.compute-1.internal
Warning: Permanently added 'ec2-75-101-178-200.compute-1.amazonaws.com,75.101.178.200' (RSA) to the list of known hosts.
Copying private key to master
id_rsa-gsg-keypair                                                                   100% 1694     1.7KB/s   00:00
/cygdrive/c/ec2/hadoop-0.20.1/src/contrib/ec2/bin/launch-hadoop-master: line 119: dig: command not found
Master is ec2-75-101-178-200.compute-1.amazonaws.com, ip is , zone is us-east-1c.
Adding test-cluster node(s) to cluster group test-cluster with AMI ami-fa6a8e93
i-ec191684
i-ee191686

Note: In Cygwin, the script may complain about not being able to find the dig DNS utility (as with above). There doesn't appear to be a standard Cygwin package that contains the utility, but not having it is okay (you'll notice that the actual IP address for the cluster is missing). Don't worry about it.

The meter has just started running... so you're being billed for usage starting now. After a little bit, you should be able to access the jobtracker webapp on port 50030 of the master, which in my case is:

http://ec2-75-101-178-200.compute-1.amazonaws.com:50030/

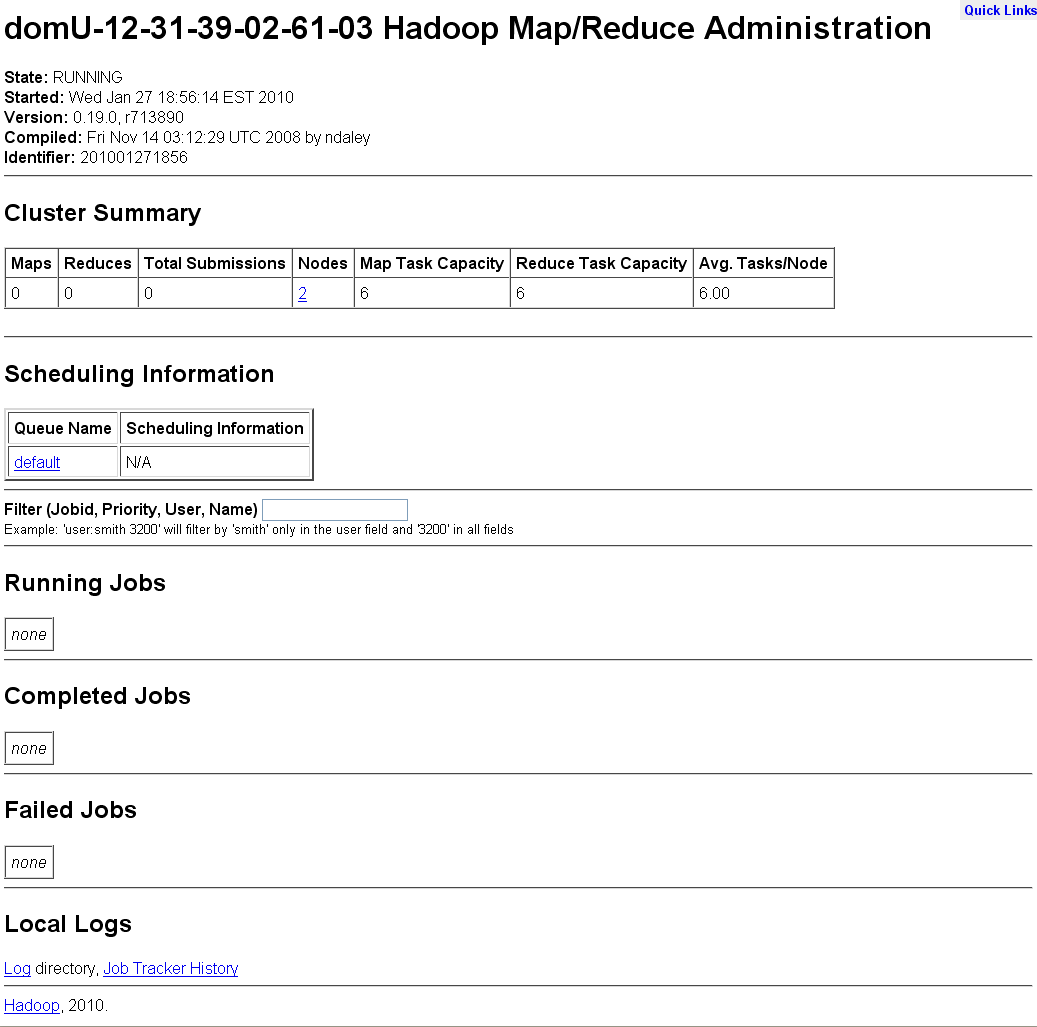
Obviously, your master will have a different public address. Now navigate to that URL in a browser, and you should see something like this screenshot of the jobtracker webapp.

Congratulations, you've just started a Hadoop cluster in the clouds! You'll notice that the cluster is actually running Hadoop 0.19.0. Unfortunately, that's the most recently available AMI (as of Jan. 2010). Under "Nodes", you should see 2, since we started up two slaves. If the number of nodes is 0, the slaves are probably booting up... wait a bit and then check again.

You can use the EC2 tools to see the instances you're running:

$ ec2-describe-instances
RESERVATION     r-6e5cc706      613871172339    test-cluster-master
INSTANCE        i-961a15fe      ami-fa6a8e93    ec2-75-101-178-200.compute-1.amazonaws.com  [...]
RESERVATION     r-ee5cc786      613871172339    test-cluster
INSTANCE        i-ec191684      ami-fa6a8e93    ec2-204-236-192-146.compute-1.amazonaws.com [...]
INSTANCE        i-ee191686      ami-fa6a8e93    ec2-75-101-191-132.compute-1.amazonaws.com  [...]

Pretty cool, huh?

Step 3: Test drive the cluster

Let's log into the cluster and poke around. Open a shell on your local machine and go to hadoop-0.20.1/src/contrib/ec2/bin. Log into the master:

$ ./hadoop-ec2 login test-cluster

Now run the pi demo:

[root@domU-12-31-39-02-61-03 ~]# cd /usr/local/hadoop-0.19.0/
[root@domU-12-31-39-02-61-03 hadoop-0.19.0]# bin/hadoop jar hadoop-0.19.0-examples.jar pi 20 1000
Number of Maps = 20 Samples per Map = 1000
Wrote input for Map #0
Wrote input for Map #1
Wrote input for Map #2
Wrote input for Map #3
Wrote input for Map #4
Wrote input for Map #5
Wrote input for Map #6
Wrote input for Map #7
Wrote input for Map #8
Wrote input for Map #9
Wrote input for Map #10
Wrote input for Map #11
Wrote input for Map #12
Wrote input for Map #13
Wrote input for Map #14
Wrote input for Map #15
Wrote input for Map #16
Wrote input for Map #17
Wrote input for Map #18
Wrote input for Map #19
Starting Job
10/01/27 19:05:49 INFO mapred.FileInputFormat: Total input paths to process : 20
10/01/27 19:05:50 INFO mapred.JobClient: Running job: job_201001271856_0001
10/01/27 19:05:51 INFO mapred.JobClient:  map 0% reduce 0%
10/01/27 19:05:58 INFO mapred.JobClient:  map 5% reduce 0%
10/01/27 19:06:01 INFO mapred.JobClient:  map 10% reduce 0%
10/01/27 19:06:03 INFO mapred.JobClient:  map 15% reduce 0%
10/01/27 19:06:04 INFO mapred.JobClient:  map 20% reduce 0%
10/01/27 19:06:05 INFO mapred.JobClient:  map 25% reduce 0%
10/01/27 19:06:07 INFO mapred.JobClient:  map 35% reduce 0%
10/01/27 19:06:09 INFO mapred.JobClient:  map 40% reduce 0%
10/01/27 19:06:10 INFO mapred.JobClient:  map 45% reduce 0%
10/01/27 19:06:11 INFO mapred.JobClient:  map 50% reduce 0%
10/01/27 19:06:13 INFO mapred.JobClient:  map 60% reduce 0%
10/01/27 19:06:15 INFO mapred.JobClient:  map 70% reduce 0%
10/01/27 19:06:17 INFO mapred.JobClient:  map 80% reduce 0%
10/01/27 19:06:19 INFO mapred.JobClient:  map 85% reduce 0%
10/01/27 19:06:20 INFO mapred.JobClient:  map 90% reduce 0%
10/01/27 19:06:21 INFO mapred.JobClient:  map 95% reduce 0%
10/01/27 19:06:22 INFO mapred.JobClient:  map 100% reduce 0%
10/01/27 19:06:31 INFO mapred.JobClient:  map 100% reduce 10%
10/01/27 19:06:36 INFO mapred.JobClient:  map 100% reduce 20%
10/01/27 19:06:41 INFO mapred.JobClient:  map 100% reduce 28%
10/01/27 19:06:47 INFO mapred.JobClient:  map 100% reduce 100%
10/01/27 19:06:48 INFO mapred.JobClient: Job complete: job_201001271856_0001
10/01/27 19:06:48 INFO mapred.JobClient: Counters: 16
10/01/27 19:06:48 INFO mapred.JobClient:   File Systems
10/01/27 19:06:48 INFO mapred.JobClient:     HDFS bytes read=2360
10/01/27 19:06:48 INFO mapred.JobClient:     HDFS bytes written=255
10/01/27 19:06:48 INFO mapred.JobClient:     Local bytes read=726
10/01/27 19:06:48 INFO mapred.JobClient:     Local bytes written=2126
10/01/27 19:06:48 INFO mapred.JobClient:   Job Counters
10/01/27 19:06:48 INFO mapred.JobClient:     Launched reduce tasks=1
10/01/27 19:06:48 INFO mapred.JobClient:     Launched map tasks=20
10/01/27 19:06:48 INFO mapred.JobClient:     Data-local map tasks=20
10/01/27 19:06:48 INFO mapred.JobClient:   Map-Reduce Framework
10/01/27 19:06:48 INFO mapred.JobClient:     Reduce input groups=2
10/01/27 19:06:48 INFO mapred.JobClient:     Combine output records=0
10/01/27 19:06:48 INFO mapred.JobClient:     Map input records=20
10/01/27 19:06:48 INFO mapred.JobClient:     Reduce output records=0
10/01/27 19:06:48 INFO mapred.JobClient:     Map output bytes=640
10/01/27 19:06:48 INFO mapred.JobClient:     Map input bytes=480
10/01/27 19:06:48 INFO mapred.JobClient:     Combine input records=0
10/01/27 19:06:48 INFO mapred.JobClient:     Map output records=40
10/01/27 19:06:48 INFO mapred.JobClient:     Reduce input records=40
Job Finished in 59.832 seconds
Estimated value of PI is 3.1414

Okay, so the value of pi is a bit off... but you've successfully submitted your first Hadoop job! Go back to the job tracker and you should see the run.

Step 4: Transfer some data

Now we're getting ready to run the word count demo. Before doing that, you have to first transfer some data over to the cloud (those are the words we're counting). Make sure you're still logged into the master. The following command shows you what's in HDFS.

[root@domU-12-31-39-02-61-03 hadoop-0.19.0]# bin/hadoop dfs -ls /
Found 2 items
drwxr-xr-x   - root supergroup          0 2010-01-27 18:56 /mnt
drwxr-xr-x   - root supergroup          0 2010-01-27 19:05 /user

Right now, not much, but we're going to put some stuff there. Open a shell on your local machine and go to umd-hadoop-core/data. Now scp the sample data over to the master.

$ scp -i YOUR_PATH/id_rsa-gsg-keypair bible+shakes.nopunc root@ec2-75-101-178-200.compute-1.amazonaws.com:/tmp

Of course, substitute YOUR_PATH and the name of your master accordingly. As a convention, I like to copy things over to /tmp/ on the master. Note that you're being charged for bandwidth usage in moving data into the clouds. Another note: you actually only need one of the files to run the word count demo, but it makes sense just to copy everything over anyway, in case you want to play with the other demos.

So now the data is on the local drive of the master. Next, we have to put the data into HDFS, i.e., distribute the data across all nodes in the cluster. Create the appropriate directories in HDFS:

[root@domU-12-31-39-02-61-03 hadoop-0.19.0]# bin/hadoop fs -mkdir /data

The dump the data into HDFS:

[root@domU-12-31-39-02-61-03 hadoop-0.19.0]# bin/hadoop fs -put /tmp/bible+shakes.nopunc /data

Now you should be able to see the data in HDFS.

[root@domU-12-31-39-02-61-03 hadoop-0.19.0]# bin/hadoop fs -ls /data
Found 1 items
-rw-r--r--   3 root supergroup    9068074 2010-01-27 19:12 /data/bible+shakes.nopunc

Data's there... now for the code.

Step 5: Transfer some code and run the word count demo

Back on your machine, open a shell and go to umd-hadoop-core/build/ (which is where Eclipse automatically puts compiled class files). Jar up the class files:

$ jar cvf cloud9.jar edu/

If there's nothing in build/, go back in Eclipse and make sure the code compiled okay. Once you have created the jar, copy it over:

$ scp -i YOUR_PATH/id_rsa-gsg-keypair cloud9.jar root@ec2-75-101-178-200.compute-1.amazonaws.com:/tmp

And finally, submit the job to the cluster:

[root@domU-12-31-39-02-61-03 hadoop-0.19.0]# bin/hadoop jar /tmp/cloud9.jar edu.umd.cloud9.demo.DemoWordCount /data/bible+shakes.nopunc /wc 10 1
10/01/27 19:16:56 INFO demo.DemoWordCount: Tool: DemoWordCount
10/01/27 19:16:56 INFO demo.DemoWordCount:  - input path: /data/bible+shakes.nopunc
10/01/27 19:16:56 INFO demo.DemoWordCount:  - output path: /wc
10/01/27 19:16:56 INFO demo.DemoWordCount:  - number of mappers: 10
10/01/27 19:16:56 INFO demo.DemoWordCount:  - number of reducers: 1
10/01/27 19:16:57 WARN mapred.JobClient: Use GenericOptionsParser for parsing the arguments. Applications should implement Tool for the same.
10/01/27 19:16:58 INFO mapred.FileInputFormat: Total input paths to process : 1
10/01/27 19:16:58 INFO mapred.JobClient: Running job: job_201001271856_0002
10/01/27 19:16:59 INFO mapred.JobClient:  map 0% reduce 0%
10/01/27 19:17:04 INFO mapred.JobClient:  map 10% reduce 0%
10/01/27 19:17:07 INFO mapred.JobClient:  map 30% reduce 0%
10/01/27 19:17:11 INFO mapred.JobClient:  map 40% reduce 0%
10/01/27 19:17:12 INFO mapred.JobClient:  map 50% reduce 0%
10/01/27 19:17:14 INFO mapred.JobClient:  map 60% reduce 0%
10/01/27 19:17:16 INFO mapred.JobClient:  map 70% reduce 0%
10/01/27 19:17:18 INFO mapred.JobClient:  map 80% reduce 0%
10/01/27 19:17:20 INFO mapred.JobClient:  map 90% reduce 0%
10/01/27 19:17:21 INFO mapred.JobClient:  map 100% reduce 0%
10/01/27 19:17:30 INFO mapred.JobClient:  map 100% reduce 20%
10/01/27 19:17:35 INFO mapred.JobClient:  map 100% reduce 100%
10/01/27 19:17:37 INFO mapred.JobClient: Job complete: job_201001271856_0002
10/01/27 19:17:37 INFO mapred.JobClient: Counters: 16
10/01/27 19:17:37 INFO mapred.JobClient:   File Systems
10/01/27 19:17:37 INFO mapred.JobClient:     HDFS bytes read=9090620
10/01/27 19:17:37 INFO mapred.JobClient:     HDFS bytes written=447180
10/01/27 19:17:37 INFO mapred.JobClient:     Local bytes read=1415836
10/01/27 19:17:37 INFO mapred.JobClient:     Local bytes written=2832006
10/01/27 19:17:37 INFO mapred.JobClient:   Job Counters
10/01/27 19:17:37 INFO mapred.JobClient:     Launched reduce tasks=1
10/01/27 19:17:37 INFO mapred.JobClient:     Launched map tasks=10
10/01/27 19:17:37 INFO mapred.JobClient:     Data-local map tasks=10
10/01/27 19:17:37 INFO mapred.JobClient:   Map-Reduce Framework
10/01/27 19:17:37 INFO mapred.JobClient:     Reduce input groups=41788
10/01/27 19:17:37 INFO mapred.JobClient:     Combine output records=101526
10/01/27 19:17:37 INFO mapred.JobClient:     Map input records=156215
10/01/27 19:17:37 INFO mapred.JobClient:     Reduce output records=41788
10/01/27 19:17:37 INFO mapred.JobClient:     Map output bytes=15919397
10/01/27 19:17:37 INFO mapred.JobClient:     Map input bytes=9068074
10/01/27 19:17:37 INFO mapred.JobClient:     Combine input records=1734298
10/01/27 19:17:37 INFO mapred.JobClient:     Map output records=1734298
10/01/27 19:17:37 INFO mapred.JobClient:     Reduce input records=101526es.
10/01/27 19:17:37 INFO demo.DemoWordCount: Job Finished in 39.591 seconds

Congratulations! You have now learned the basics of Hadoop on EC2. Step 1 starts your cluster in the clouds, so you have to do it before you start working every time. Step 4 is required every time you want to process a new dataset—you have to copy it into the clouds. Step 5 represents your typical debug cycle: write code, pack it up, scp it over to the cluster, and submit the job.

You might be wondering, how do you see the actual output of the program? Word counts are stored in a directory in HDFS specified in the MapReduce program. You can see those files by issuing the following command:

[root@domU-12-31-39-02-61-03 hadoop-0.19.0]# bin/hadoop fs -ls /wc
Found 2 items
drwxr-xr-x   - root supergroup          0 2010-01-27 19:16 /wc/_logs
-rw-r--r--   3 root supergroup     447180 2010-01-27 19:17 /wc/part-00000

A file gets created for each reducer, and the final key-value pairs get written there. Since this demo specifies only one reducer, we have only one file. You can fetch this file from HDFS and then do whatever you want with it (examine the output, scp back to your local machine, etc.):

[root@domU-12-31-39-02-61-03 hadoop-0.19.0]# bin/hadoop fs -get /wc/part-00000 .
[root@domU-12-31-39-02-61-03 hadoop-0.19.0]# head part-00000
&c      70
&c'     1
''all   1
''among 1
''and   1
''but   1
''how   1
''lo    2
''look  1
''my    1
[root@domU-12-31-39-02-61-03 hadoop-0.19.0]# tail part-00000
zorites 1
zorobabel       3
zounds  20
zuar    5
zuph    3
zur     5
zuriel  1
zurishaddai     5
zuzims  1
zwaggered       1

For more on working with HDFS, see this guide to HDFS shell commands.

And that's it! If you're feeling up to it, you might want to continue on directly to my next tutorial, getting started with S3. Otherwise, remember the most important thing of all... continute to step 6.

So what's the "elastic" part of the cloud? If you need more processing power, you can grow your cluster dynamically with the following command (which will add five instances to your cluster):

$ bin/hadoop-ec2 launch-slaves test-cluster 5

In fact, you can issue the command as many times as you want to grow your cluster! In theory, HDFS should kick in a rebalance all your data blocks, ensure proper replication, etc. However, if your HDFS data is stored in S3, I've found it easiest to simply remove all files from HDFS and recopy over from S3 (in essence, forcing proper redistribution of the blocks).

Step 6: Clean up!

You'll want to clean up after you're done. Remember, the meter doesn't stop (i.e., the bill continues to accumulate, dime by dime) until you shut down your Hadoop cluster. To do so, open a shell on your local machine and go to hadoop-0.20.1/src/contrib/ec2/bin:

$ ./hadoop-ec2 terminate-cluster test-cluster
Running Hadoop instances:
INSTANCE        i-961a15fe      ami-fa6a8e93 [...]
INSTANCE        i-ec191684      ami-fa6a8e93 [...]
INSTANCE        i-ee191686      ami-fa6a8e93 [...]
Terminate all instances? [yes or no]: yes
INSTANCE        i-ec191684      running shutting-down
INSTANCE        i-961a15fe      running shutting-down
INSTANCE        i-ee191686      running shutting-down

Confirm that the instances have indeed gone away:

$ ec2-describe-instances
RESERVATION     r-6e5cc706      613871172339    test-cluster-master
INSTANCE        i-961a15fe      ami-fa6a8e93                    terminated [...]
RESERVATION     r-ee5cc786      613871172339    test-cluster
INSTANCE        i-ec191684      ami-fa6a8e93                    terminated [...]
INSTANCE        i-ee191686      ami-fa6a8e93                    terminated [...]

And this concludes your first adventure in the clouds!

Postscript

Log into your AWS account and check your bill: right side of your screen, "Your Account" drop-down menu, "Account Activity". How much cash did you burn? Now, is utility computing fun or what?

Common Issues

In Windows, avoid paths with ~ and paths with space

Paths with spaces break the EC2 scripts. Avoid using ~ in paths also since it (depending on setup) maps to C:\Document and Settings\..., which has spaces in it.

EC2 Authentication errors

If you're getting an error such as the following:

Client.AuthFailure: AWS was not able to validate the provided access credentials

Check to see if you've actually signed up for your EC2 account. Note that once you've signed up for your AWS account, you still must sign up for EC2.